Sunday, February 28, 2010

Rice Krispie Treats

Rice Krispie treats are a staple American dessert, and are often used as a easy first cooking lesson for children. I'm a total novice at cooking so this seemed like a good place to start!

I know nothing about cooking, and I reluctantly joined Sunday dinner group (through marriage). I must confess that after a few weeks I'm actually starting to get into it.

As I was picking such an easy dish I decided to add a little excitement by throwing some Oreos into it.

One baking dish of rice krispie cake yields about 10 to 12 decent sized servings, all for about $5. You will need:
  • 12 oz (340g) standard size box of Rice Krispies - $2.50
  • 18 oz (510g) bag of Marshmallows - $1.50
  • 15 reduced fat Oreos - $1
  • 4.5 tbsp of butter (about half a stick) - $0.25

I try to eat reasonably healthy food, so I adapted the recipe accordingly. The standard recipes suggest having 6 tbsp of butter, but almost all the saturated fat and cholesterol come from the butter, so I just reduced the amount. The reduced fat Oreos have half the saturated fat of the normal ones, and they honestly taste just as good.

I put all the nutritional information into a spreadsheet and crunched the numbers. Each rice krispie treat serving (about the size of a soda can) contains:

RDA%
Calories40016%
Saturated fat3.7g18%
Cholesterol14mg5%
Sodium338mg14%
Carbohydrates79g26%

If I can find a substitute for butter that doesn't ruin the flavor then this would be a really healthy dessert - you could reduce the amount saturated fat significantly, and there would be no cholesterol. I'll definitely investigate that next time I make it.

As for cooking, the only tricky bit is stopping the mixture from sticking to anything it touches. Apparently you should cover your hands and stirring implement with cooking spray (e.g. 'Pam'), but I only found this out afterwards.

The instructions are simple:
  • get a baking dish ready and spray it with cooking spray
  • chop the Oreos
  • melt the butter in a huge pot on the hob on low heat (e.g. level 2 of 10)
  • add the marshmallows, stir constantly until they are liquid
  • add the rice krispies and stir furiously, this is damn hard work!
  • once mixed, add the Oreos and stir until mixed
  • remove from heat and force contents into a baking dish
  • smooth the top for a nice finish
You can eat it warm, or at room temperature. I wouldn't recommend putting it in the fridge, apparently it loses some of its crunchiness. Enjoy!

Saturday, February 27, 2010

English Sticky Toffee Pudding

I first had this cake in England, and I was incredibly hesitant about having it because the description had dates.  Who the hell eats dates, especially in a freaking dessert?!  Anne convinced me to have it, and it was pretty hard to say no to because it was the only dessert on the menu that included ice cream.  Let me tell you, it is probably one of the best cakes I have ever made and everyone falls in love with it!!!

First you need about 3/4 of a cup of dates.  Take the pits out and chop them up (finely if you don't like the consistency, or coarsely if you want texture).  Place the dates in a bowl and put a teaspoon of baking soda.  Boil a cup and a quarter cups of water and place it in with the dates.  Stir it a bit, then set it aside.

Then you want to sift a cup of flour and a teaspoon of baking powder.

In an electric mixing bowl, put a stick of butter in with 3/4 of a cup of sugar.  Beat until creamy.  Then add a teaspoon of vanilla and one egg until super smooth and creamy.  Gradually pour in the flour (it should resemble cookie dough).  Once all the flour is in, set the mixer to the very lowest setting.  Then slowly add the dates and liquid--if you just dump it all in, be prepared for a big splash!!!

When everything is well incorporated, pour into a buttered and floured cake pan or cupcake tin.  Place in a 350 degree for about 35 minutes (until a toothpick comes out clean).

The piece de resistance is really the toffee sauce.  In a sauce pan, add two sticks of butter, a half a cup of heavy cream, and a cup of brown sugar on a medium low heat till it's all melty.  Then add on top of the cake.  You can also whip up some heavy cream, add whipped cream from a can, or a scoop of vanilla ice cream.  Such a yummy yummy dessert!!!  :)

Real Banana Pudding!

So this is an old Southern favorite, except the South prefers making a layer type of pudding--vanilla pudding, sliced bananas, vanilla cookies, repeat.  This is fine and good, except I want real bananas infused into my pudding, but not from a box.  You can also use banana extract, if you like the alcoholy after taste.  Really, you want bananas!

I typically use about two bananas and put them in my food processor.  You can also mash them if you would like a rustic, chunky pudding.  Place this in a very large measuring cup.  Pour in half and half till you have 3 cups total of both banana and milk.  This is extremely important because if you don't, you'll have more of a banana yogurt (and that isn't fun at all!).  In a sauce pan (preferably one with a pour spout), combine 3/4 of a cup of sugar and 3 tablespoons of cornstarch and combine the milk concoction and set the stove top to medium.  It is very important to continue stirring the contents at the bottom, otherwise you'll end up with burned sugar.  This recipe tries your patience because you have to continue stirring until this bad boy thickens up like pudding.  Once it becomes thick, you want to temper four egg yolks.  Tempering is where you take about 3 tablespoons of the hot stuff (the milk concoction) and whisk it into the eggs--this prevents the eggs from scrambling.  Once tempered, pour the eggs in whilst you whisk so you don't end up scrambled eggs at the bottom.  Then put in a tablespoon of butter and melt it in.  Once melted, take it off the heat and pour into four serving containers.  Refrigerate to set.

This is a gluten free dessert as is.  My sous chef helped me caramelize some bananas to make it look pretty (you just sugar the sides and fry them in a pan with a bit of butter).  Once you add normal vanilla wafers, the recipe obviously is no longer gluten free.

I usually don't like pudding, especially pudding out of a box.  This pudding is super awesome.  And you can do so much to it (e.g., layer fruits or cookies).  So yummy.  I highly recommend you make this for guests, who are totally going to be impressed when you tell them it's not from a box!

Thursday, February 25, 2010

London Broil Over Aligot

So sorry for being a really crappy blogger.  But you know what?  My cohorts are no better, so I believe I have done well considering.

Anyhoo, it seems as though Snowpocalypse Redux and the Super Bowl were ages ago, but the food lives on in my mind!  And here is how you make an awesome London Broil!!!

Get yourself a good top round roast cut piece of beef (they might label it as London Broil).  Now usually I would marinate my beef overnight, but since my housemate is allergic to gluten I was unable to use soy sauce.  Otherwise, I would stick the beef in a plastic bag, dump some soy sauce, garlic powder, onion powder, and pepper, then let it sit overnight in the fridge.  Instead I dumped some Worcestershire sauce, garlic powder, onion powder, kosher salt, and pepper in a bag with the meat, then let it marinade in the fridge for about 5 hours.  You don't want to marinade anything with Worcestershire sauce for more than 6 hours because there's vinegar in it and it will make the meat funny.

30 minutes before you want to start cooking, you want to bring your meat out to let it get back to room temperature.  In the meantime you want to start the aligot!

Aligot is really just fancy, French style potatoes.  It is incredibly rich and fattening and yummy!!!  So you peel, cut, and boil your potatoes until tender like you are making mashed potatoes.  So in a sauce pan, you want to add some whole garlic cloves (I used 2 cause I like garlic) and about a cup of sour cream and a cup of heavy cream over medium heat--don't boil them, but you want it hot.  When the potatoes are tender and you have drained them, put them back on the stove top on a medium-low heat.  You want to mash them with your trusty masher with about a half stick of butter, the cream, and some salt and pepper.  Now you must be thinking to yourself, "That's just regular mashed potatoes!!!"  Wait, there's more!!!  Once it is slightly creamy, you want to start adding in some grated cheddar cheese (I use the white kind).  You are going to add about 3 to 4 cups of cheese until it becomes incredibly smooth and almost like melted Velveeta.  You will never ever go back to regular mashed potatoes again--trust me!!!

So once the potatoes are done, heat your trusty broiler up.  Place the rack just far enough down so that your meat isn't pressing up against the broiler heat.  Put your meat in for about 7-8 minutes (depending on thickness), then flip it over and place it under the heat for another 7-8 minutes.  Once done, take it out and place it on your butcher's board and cover it with foil and have it sit for 10 minutes.  This will allow it to cook a bit further and make it jucier.  Once done, you should have about a medium rare done piece of steak that will compliment your aligot!  My mouth is totally salivating at the thought of this meal.

My aligot didn't turn out well for Super Bowl though, mainly cause I didn't have enough cheese to make it velveety.  So buy a lot of cheese!  It's worth it!  Enjoy everyone!

Thursday, February 11, 2010

Shrimp Ravioli - A Ravioli Without Cheese


I know what you are thinking--a true Italian ravioli must have cheese in it!  And in most instances I would have to agree with you since I used to live in Rome and know how they eat.  I also sensed some hesitance with this item on the Super Bowl menu as everyone preferred the beef to the pasta.  But whether you are an Italian, foodie, or like me, not really into cheese (sorry everyone), you should really really try this out.

What makes this dish awesome is the amount of fresh herbs used in both the filling and the sauce.  I haven't tried using dried herbs, so I couldn't tell you if that would be an appropriate substitute if you were attempting to do so.  If you can get your hands on fresh herbs, do it cause you will not regret it!

Another tip... if you have a pasta roller, use it!!!  If you are Italian and know how to freshly roll your own ravioli, do it!!!  If you are like me, and have tried and ultimately failed to roll pasta by hand, go to the grocery store and buy wanton wrappers--they work just as well.  And if you want to fool your guests (like Serge), you can buy a cheap ravioli cutter and cut the edges to make it look as though you hand rolled it yourself!

Again, this is a nice recipe to have in your arsenal of fancy, but not very hard, meals to make.  For a meal for two, you need about a half a pound of shrimp that's de-shelled and de-veined, fresh basil, fresh chives, and fresh cilantro.  Put your cleaned shrimp in the food processor.  Take a bunch of basil, chives, and cilantro and throw them in as well.  Then add a little bit of salt and pepper and a tablespoon or two of olive oil.  Pulse the stuff, but not puree, until is well combined.  At this point you can store the filling to fill your ravioli later, or you can make it now.  You want to put egg wash on one wanton, then place about a teaspoon of filling, before you put the other wanton on top.  Then trim the edges so your guests won't get mostly pasta.  And when filling, make sure you push out as much air as possible so that it doesn't explode in the boiling water.  This will be the most tedious process.

To make a nice rustic tomato sauce (which can be used for just about any pasta), take 2 pints of grape or cherry tomatoes (I like a lot of sauce) and put them on a baking sheet.  Generously sprinkle some olive oil, salt, and pepper and put under the broiler for 5 to 10 minutes.  You just want to heat them up until they burst.  Then take your fresh herbs (basil, chives, and cilantro), and chop them up really finely.  While you are at it, chop up two or three shallots (or you can use an onion).  In a big sauce pan on medium heat, put a dash of olive oil and the chopped shallots.  When they become soft, add your tomatoes and herbs and mix them well.  Add more salt and pepper if you think it needs more.  And that's it--you have your rustic sauce!

I think this dish surprised my Super Bowl guests a lot.  A few folks who ordered the steaks were able to try the the pasta and absolutely raved about it.  With Valentines Day a few days away, this is also a good dish to impress your significant other.  It may not look like much on paper, but it definitely packs a punch!  Enjoy!

Tuesday, February 9, 2010

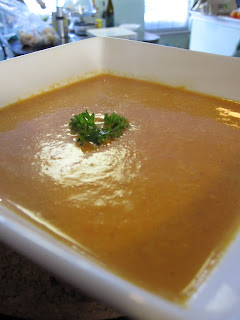
Roasted Red Pepper Soup

I've made this soup a few times, and I haven't quite figured out how to up the ante of the spice without making it taste like hot sauce.  This one by far was the best batch, and is probably one of the most intensive soups I've made.  It is also gluten free, which pleases my housemate cause he can partake.

What makes this soup really great is the smokey flavor of a roasted red pepper.  I cheated though cause I put mine under the broiler.  But if you have an open flame or a grill or something with fire, do it cause you won't go wrong.  You want a good char on the skin, and once it's all done place it in a paper bag.  To cool it quickly, immediately put it in the freezer (it saves you loads of time).  In about 10 minutes, pull them out and they should be reasonably cool so that you can easily peel off the chard skin with your fingers.  And there my friend is a nice roasted red pepper.

For the soup, you'll need about 10 chopped roasted red peppers, a chopped onion, garlic, some butter, chicken stock, a little tomato paste, heavy cream, salt, pepper, chili pepper powder, and some corn starch for some thickening power.  You don't have to worry about how finely chopped your stuff is cause it's all going in a blender (or if you have one, you can use an immersion blender).

You take about a tablespoon or so of butter and melt it in a large stock pot on a medium or so setting.  You then saute the onions and the garlic until the onions are soft and translucent.  Then add your peppers, 2 cartons of chicken stock (about 5 or 6 cups), and a heaping amount of tomato paste.  If you add more, the soup is redder, but it reduces the spiciness; something to think about.  Bring that baby up to a boil.  Then simmer it down and add about 2, 2.5 cups of heavy cream.  Add your spices.  Take about 2 tablespoons of corn starch and put in a small bowl with a little bit of cold water.  Stir it until it is just a liquid.  While stirring the soup add the corn starch.  Let it sit for 15 minutes.  Then take it off the heat and blend it!  Be careful when blending too.  You are definitely going to have to do it in batches.  And if you completely seal the blender, your soup will most definitely explode.  Blenders nowadays come with a little plastic top that you can take off so you can add stuff to things while it's blending.  You want to tilt it so that there's a slight airway for the heat and steam to escape.  Otherwise your kitchen will be a hot red mess.

Now you can serve the soup as is.  Or you can add a little sweet component to it.  I've had the soup with some blue crab chunks, and this is by far the best thing ever!  All you do is add the crab after you blend it, and little simmer for about 20 minutes.  But if you are a little low on dough, you can add a can of sweet corn (not the creamed kind though).  And there's your soup.  For the Super Bowl, I used corn cause I was planning on serving 20 or so people, and most were already have steak.  Enjoy!

Monday, February 8, 2010

Crostinis Three Ways - Sun Dried Tomatoes and Feta (not Fee-ta)

Again, crostinis are awesome!  And these were the ones that everyone kept stuffing their face with.  Here is how to make the toasty bread.

These were by far the most popular of the three crostinis I made for Super Bowl.  I'm not sure if it's cause people are just naturally addicted to feta (not fee-ta) or if it was the tangy, sweet sun dried tomatoes.  Whatever it was, everyone could not stop talking about it.  It was the most time consuming to make, which is probably why I didn't like them so much.  But once they are done, you can serve them immediately or store them in the fridge and whip them out later.  Regardless, if you want to impress, these are a definitely go-to hor d'oeuvre.

You need a jar of sun dried tomatoes that comes in oil.  Take the tomatoes out and chop them up (I prefer a coarse chop).  You also need some chopped onions and garlic, some sugar, some red wine vinegar, chicken broth, salt, and pepper.

So you take a pot, or a saucepan (just make sure either has a lid).  You want to put a bit of the oil from the jar into the pan and set it to medium.  You are going to dump the onions and garlic.  When the onions become translucent you are going to add some vinegar and the chicken broth.  Generally the ratio is 2:1 chicken broth to vinegar.  And it's about a half a cup or so of chicken broth.  If you want a more tangy topping, add a dash or two of sugar.  If not, add a tablespoon or two of sugar.  Then add a bit of salt and pepper.  Incorporate, and bring it to the boil.  Once boiling, bring it down to a simmer and cover it.  You will remove it from the heat when there's pretty much no liquid left (every time I've made it, there's a bit of oil left).  Keep a close eye on it cause a common thing that happens is that you end up burning the bottom.  So you want to occasionally stir the fantastic stuff.  When it's done, set it aside or you can store it in the fridgey!

When your crostinis are toasted, add the tomatoes and then top it with a bit of feta.  I usually use two jars of sun dried tomatoes because these are pretty popular.  But that means you have to add more liquid and stuff.

I hope you all give crostinis a shot at your next party.  The only laborious process is toasting the bread itself.  But you can easily make the toppings the day before.  You'll get a lot of praise for them, and you can feel like a super chef!